 HowTo: BasePairer
Why it matters
BasePairer allows the user to investigate and discover. The first step is conversion from color-symbolism (red = oxygen; blue = nitrogen) to charge symbolism (+, -) because it's this aspect that is critical to understanding. From there, the right-side base can be flipped, rotated, etc. while tracking the relative position of the phosphate backbone. In this way, 'fits' and conflicts between any of the offered pairs can be investigated. Further, several chemically altered (aka mutated) bases can be checked for their partner preferences.Older BasePairer
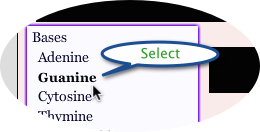
(Requires browser plug-in). First, select a base for study using the bases menu in the left panel. Guanine's a good choice
After making a similar selection on in the right side menu (cytosine is a nice choice), you're transported to the 'charges' area. Here, the task is to 'label' each of the bases appropriately for thinking about how the basepairs pair. In an effort to demonstrate that the basepairing positions aren't chemically 'special', the task is only deemed complete when all partial (+) and (-) charges around the periphery are labeled. First click all H-bond donors (note that the instructions allow you to select donor or acceptor radio button)
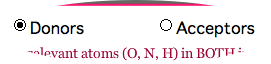
Click the relevant atoms in the images; the program will point out errors and may refer to the electronegativity values (to the right of the base images) as a guide. Shown is the state of guanine after one H-bond acceptor and one H-bond donor have been labeled

When both bases have been correctly and completely labeled, you'll get a positive feedback message and then are transported back to the pairing area. From this point, only NEW selections will need to be labeled (for logged in users, correctly labeled bases are also stored between sessions).
To explore pairing interactions, use these controls:
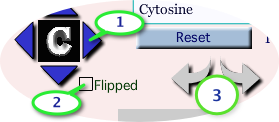
- Blue triangles move the base in the direction indicated
- 'Flipped' checkbox flips the base top-to-bottom like a pancake, allowing you to study parallel (not checked) and anti-parallel (checked) orientation of this base relative to the one on the right. Note that the base indicator (here 'C' for cytosine) will flip as well
- clockwise/anti-clockwise rotation arrows
- The 'Reset' button restores the starting orientation
Movies
New version!
Runs without a plug-in (no Java, no Shockwave) but generates lovely images using jsMol--and therefore works in iPads & such. It has the basic features--showing a base, manipulating it spatially, indicating partial (+) and (-) at the basepairing position. My goal is to give it all the capabilities of the existing version (see left), including storage of student work (the 'Orientation' button is proof-of-principle that the orientations on-screen can be encoded; that which can be coded can be reproduced!).